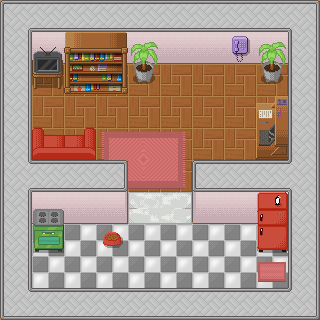
Tile sets are a very simple way to draw scenarios with repeated elements. From simple to complex ones using a very low footprint.
First step, load the png file that stores the tileset into a Image. The file tiles.png shoud be in the same directory of the source code. I adjusted some tiles from those tile set I’ve blogged here before into a grid of 10×10 tiles.

var tileset = Image {
   url: "{__DIR__}tiles.png"
}
Notice that each tile have 32 of height and 32 of width. We will assume this and use theses numbers when performing calculations to find a single tile in our tile set.
def w = 32;
def h = 32;
To display a Image in the screen we use a ImageView node. A ImageView can have a viewport property to create crop or zoom effect. A viewport is just a Rectangle2D, a object with position (minX and minY), height and width. If we want to display the first tile in the tileset we do

ImageView {
   image: tileset
   viewport: Rectangle2D{
      minX: 0, minY: 0, height: 32, width: 32
   }
}
Notice that the minX determines the column and minY the row in the tileset. The first row is 0*32, the second row is 1*32 and so on. If we want to display the tile at the second line and third column of the tileset we do

ImageView {
   image: tileset
   viewport: Rectangle2D{
      minX: 2 * 32 , minY: 1*32, height: 32, width: 32
   }
}
Those properties in a Rectangle2D are for init and read only. So I created a list with all Rectangles I can need for use as a viewport.
def viewports = for (row in [0..9]) {
   for (col in [0..9]) {
       Rectangle2D{
           minX: col * w, minY: row * h, height: w, width: h
       }
   }
}
The scenario map is stored in another list. The first element of the list is 7, that is, the first tile in the scenario is the 7th tile from the tile set.
var map = [
    7,  3,  3,  3,  3,  3,  3,  3,  3,  8,
   19, 26, 40, 41, 24, 13, 13, 23, 24, 19,
   19, 36, 50, 51, 34,  2,  2,  2, 34, 19,
   19,  2,  2,  2,  2,  2,  2,  2, 25, 19,
   19, 57, 58, 44, 45, 46,  2,  2, 35, 19,
   27,  3,  3,  6, 55, 56,  5,  3,  3, 38,
   19, 60, 13, 16, 47, 48, 15, 13, 61, 19,
   19, 70,  1, 33,  1,  1,  1,  1, 71, 19,
   19,  1,  1,  1,  1,  1,  1,  1, 49, 19,
   17,  9,  9,  9,  9,  9,  9,  9,  9, 18,
];
Finally to create a scenario with 100 tiles, 10 per row and with 10 rows, in a list called tiles. Each iteration of this loop creates a ImageView. Each ImageView will store a single tile. We get the tile number in the map list and so use it to index the viewports list.
var tiles =  for (row in [0..9]) {
   for (col in [0..9]) {
      ImageView {
         x: col * w, y: row * h,
         viewport: bind viewports[map[row * 10 + col]]
         image: tileset
      }
   }
}
Additionally I added two things to transform this program also in a (extremely)Â simple map editor. At each ImageView I added a callback for onMouseClicked event. When you click on a tile, it changes its map position, ie, the tile. The next tile for the left button and the last tile for any other button.
onMouseClicked: function( e: MouseEvent ):Void {
   var amount = if(e.button == MouseButton.PRIMARY) { 1 } else { -1 };
   map[row * 10 + col] = (map[row * 10 + col] + amount) mod 100;
}
The other thing is to print the map list when the program is over. There is the full program:
package tileeditor;

import javafx.stage.Stage;
import javafx.scene.Scene;
import javafx.scene.image.ImageView;
import javafx.scene.image.Image;
import javafx.scene.CustomNode;
import javafx.scene.Group;
import javafx.scene.Node;
import javafx.geometry.Rectangle2D;
import javafx.scene.input.MouseEvent;
import javafx.scene.input.MouseButton;

def w = 32;
def h = 32;

var map = [
    7,  3,  3,  3,  3,  3,  3,  3,  3,  8,
   19, 26, 40, 41, 24, 13, 13, 23, 24, 19,
   19, 36, 50, 51, 34,  2,  2,  2, 34, 19,
   19,  2,  2,  2,  2,  2,  2,  2, 25, 19,
   19, 57, 58, 44, 45, 46,  2,  2, 35, 19,
   27,  3,  3,  6, 55, 56,  5,  3,  3, 38,
   19, 60, 13, 16, 47, 48, 15, 13, 61, 19,
   19, 70,  1, 33,  1,  1,  1,  1, 71, 19,
   19,  1,  1,  1,  1,  1,  1,  1, 49, 19,
   17,  9,  9,  9,  9,  9,  9,  9,  9, 18,
];

var tileset = Image {
    url: "{__DIR__}tiles.png"
}

def viewports = for (row in [0..9]) {
   for (col in [0..9]) {
       Rectangle2D{
           minX: col * w, minY: row * h, height: w, width: h
       }
   }
}

var tiles =  for (row in [0..9]) {
   for (col in [0..9]) {
      ImageView {
         x: col * w, y: row * h,
         viewport: bind viewports[map[row * 10 + col]]
         image: tileset

         onMouseClicked: function( e: MouseEvent ):Void {
            var amount = if(e.button == MouseButton.PRIMARY) { 1 } else { -1 };
            map[row * 10 + col] = (map[row * 10 + col] + amount) mod 100;
         }
      }
   }
}

Stage {
    title: "JavaFX Simple Tile Editor"
    scene: Scene {
        content: [ tiles ]
    }
    onClose: function() {
        println(map);
    }
}
Here is the result for that map

And you can try it yourself in your browser. Play it online now.
Here is a video of it working
[youtube]lxuBEoItB5E[/youtube]
Downloads:
Possibilities
We are using just a image that can handle 100 tiles, tiles.png with less than 30Kb. The map is also composed with 100 tiles. Each tile we can choose between 100 different tiles, so we can compose 10100 different maps (one googol10 ). Most of them are useless and without any sense, but some are cool. 🙂


