Skip to content

Month: March 2009

NhamNham

A work under progress. A first monster for a big set of monster I want to create. This one is called NhamNham.

nhamnham animoted

NhamNham lives in forests and swamps and can be quite aggressive atacking with his forehead horn.

nhamnham

Here in this picture they organized a attack to a village and are been repealed by soldiers.

nhamnham atacking

My Free Tileset, version 8

One more version of the my free tileset for game development. This little world is beautifully growing, now towards medieval themes. Now is already possible to imagine a typical day in a little rpg village:

tiny rpg village

And here the tileset, eighth version:

free tileset version 8

Changelog:

  • Medieval straw roof house and variations with and without signs, window, chimney and flowers.
  • Signs for weapons, potions and armor store and for hotel.
  • More vegetations.
  • A dirt road.

CEJUG Podcast #2

cejug podcast java
[audio:http://cejug.podomatic.com/enclosure/2009-03-17T08_20_43-07_00.mp3]

O Igo Coelho recebe neste episódio eu e  o Amaury Brasil,  falamos sobre o que é o CCT, PUJ e os temas do próximo encontro dia 23 de março de 2009 na UNIFOR. Apresentando o LWUIT com Daniel Valente e Introdução a programação em Java para a TV Digital com Amaury Brasil.

podcast

Fotos da gravação lá na Fortes.

Parabéns ao Igo Coelho mais uma vez pela iniciativa e a todos que contribuíram para fazer mais esse episódio do CEJUG Podcast acontecer. ;D

BumbaBot-1

I got a simple motor from a broken domestic printer. It’s a Mitsumi m355P-9T stepping motor. Any other common stepping motor should fits. You can find one in printers, multifunction machines, copy machines, FAX, and such.

bumbabot v01

With a flexible cap of water bottle with a hole we make a connection between the motor axis and other objects.

bumbabot v01

bumbabot v01

With super glue I attached to the cap a little handcraft clay ox statue.

bumbabot v01

It’s a representation from a Brazilian folkloric character Boi Bumbá. In some traditional parties in Brazil, someone dress a structure-costume and dances in circular patterns interacting with the public.

776513346_c31db6843b_m

2246467684_49164d3397_m
Photos by Marcus Guimarães.

Controlling a stepper motor is not difficult.  There’s a good documentation on how to that on the Arduino Stepper Motor Tutorial. Basically it’s about sending a logical signal for each coil in a circular order (that is also called full step).

full step

Animation from rogercom.com.

stepper motor diagram

You’ll probably also use a driver chip ULN2003A or similar to give to the motor more current than your Arduino can provide and also for protecting it from a power comming back from the motor. It’s a very easy find this tiny chip on electronics or automotive  stores or also from broken printers where you probably found your stepped motor.

Arduino Stepper Motor UNL2003A

With a simple program you can already controlling your motor.

// Simple stepped motor spin
// by Silveira Neto, 2009, under GPLv3 license
// http://silveiraneto.net/2009/03/16/bumbabot-1/
int coil1 = 8;
int coil2 = 9;
int coil3 = 10;
int coil4 = 11;
int step = 0;
int interval = 100;

void setup() {
  pinMode(coil1, OUTPUT);
  pinMode(coil2, OUTPUT);
  pinMode(coil3, OUTPUT);
  pinMode(coil4, OUTPUT);
}

void loop() {
  digitalWrite(coil1, step==0?HIGH:LOW);
  digitalWrite(coil2, step==1?HIGH:LOW);
  digitalWrite(coil3, step==2?HIGH:LOW);
  digitalWrite(coil4, step==3?HIGH:LOW);
  delay(interval);
  step = (step+1)%4;
}


Writing a little bit more generally code we can create function to step forward and step backward.

My motor needs 48 steps to run a complete turn. So 360º/48 steps give us 7,5º per step. Arduino has a simple Stepper Motor Library but it doesn’t worked with me and it’s also oriented to steps and I’d need something oriented to angles instead. So I wrote some routines to do that.

For this first version of BumbaBot I mapped angles with letters to easy the communication between the programs.

motor angle step control

Notice that it’s not the final version and there’s still some bugs!

// Stepped motor control by letters
// by Silveira Neto, 2009, under GPLv3 license
// http://silveiraneto.net/2009/03/16/bumbabot-1/

int coil1 = 8;
int coil2 = 9;
int coil3 = 10;
int coil4 = 11;

int delayTime = 50;
int steps = 48;
int step_counter = 0;

void setup(){
  pinMode(coil1, OUTPUT);
  pinMode(coil2, OUTPUT);
  pinMode(coil3, OUTPUT);
  pinMode(coil4, OUTPUT);
  Serial.begin(9600);
}

// tells motor to move a certain angle
void moveAngle(float angle){
  int i;
  int howmanysteps = angle/stepAngle();
  if(howmanysteps<0){
    howmanysteps = - howmanysteps;
  }
  if(angle>0){
    for(i = 0;i

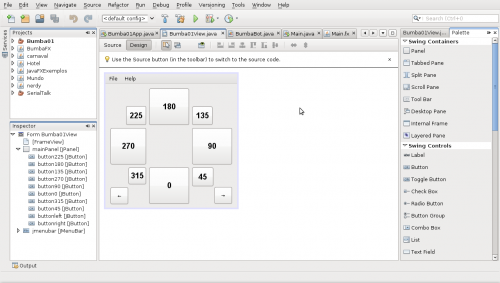
In another post I wrote how create a Java program to talk with Arduino. We'll use this to send messages to Arduino to it moves. 

captura_de_tela-bumba01-netbeans-ide-65

[put final video here]

To be continued... 🙂

OGG com qualidade

Para o controle de qualidade quando encondando vídeos com o FFmpeg use o parâmetro -qscale seguido de um número. Os número podem ir de 1 (melhor qualidade) até 31 (pior qualidade), sendo que 13 já é uma qualidade bem ruim.

Convertendo pro exemplo um vídeo chamado exemplo.flv para um arquivo ogg com a melhor qualidade seria:

ffmpeg -i exemplo.flv -qscale 1 saida.ogg

Sem usar esse parâmetro os arquivos encodados em OGG ficam com uma qualidade mediana. Uma opção bem útil é usar a mesma qualidade do arquivo de entrada, já que não é possível melhorar a qualidade do vídeo mesmo. Para isso existe o parâmetro -sameq. No exemplo anterior bastaria:

ffmpeg -i exemplo.flv -sameq saida.ogg

Com isso eu tenho reduzido os vídeos da minha câmera para arquivos que só ocupam cerca de 1/5 do tamanho original e ainda assim mantém a mesma qualidade.

Casa Brasil na TV

Esse é uma amostras dos bastidores do que rolou nas filmagens nessa terça-feira na Casa Brasil unidade Vila União. As filmagens são por mim e pela pequena Vitória de apenas 5 anos. =)

A reportagem vai ao ar no canal da Globo, esse sábado ao meio dia. Não percam!

Atualizado em 7 de Março:

Algumas fotos dos bastidores da gravação.

Reportagem Reportagem Reportagem Globo? Reportagem Reportagem

Pra quem não assistiu na TV, eu gravei com a câmera, aqui está.

Download: cbvilauniaonatv.ogg

Parabéns Alyne, Alexandra, Leonardo e todos, vocês foram ótimos!

Arduino and Java

Arduino

Arduino is a free popular platform for embedded programming based on a simple I/O board easily programmable. Interfacing it with Java allow us to create sophisticated interfaces and take advantages from the several API available in the Java ecosystem.

I’m following the original Arduino and Java interfacing tutorial by Dave Brink but in a more practical approach and with more details.

Step 1) Install the Arduino IDE

This is not a completely mandatory step but it will easy a lot our work. Our program will borrow some Arduino IDE libraries and configurations  like which serial port it is using and at which boud rate. At the moment I wrote this tutorial the version of Arduino IDE was 0013.

Step 2) Prepare your Arduino

Connect your Arduino to the serial port in your computer. Here I’m connecting my Arduino with my laptop throught a USB.

Arduino

Make sure your Arduino IDE is configured and communicating well if your Arduino. Let put on it a little program that sends to us a mensage:

void setup(){
  Serial.begin(9600);
}

void loop(){
  Serial.println("Is there anybody out there?");
  delay(1000);
}

Step 3) Install RXTX Library

We will use some libraries to acess the serial port, some of them relies on binary implementations on our system. Our first step is to install the RXTX library (Java CommAPI) in your system. In a Debian like Linux you can do that by:

sudo apt-get install librxtx-java

Or using a graphical package tool like Synaptic:

installing rxtx

For others systems like Windows see the RXTX installation docs.

Step 4) Start a new NetBeans project

Again, this is not a mandatory step but will easy a lot our work. NetBeans is a free and open source Java IDE that will help us to develop our little application. Create a new project at File → New Project and choose at Java at Categories and Java Application at Projects.

netbeans new project

Chose a name for your project. I called mine SerialTalker.

name your project

At the moment I wrote this tutorial I was using Netbeans version 6.5 and Java 6 update 10 but should work as well on newer and some older versions

Step 5) Adding Libraries and a Working Directory

On NetBeans the Projects tab, right-click your project and choose Properties.

libraries

On the Project Properties window select the Libraries on the Categories panel.

Netbeans project libraries

Click the Add JAR/Folder button.

arduino directory

Find where you placed your Arduino IDE installation. Inside this directory there’s a lib directory will some JAR files. Select all them and click Ok.

jars libraries

As we want to borrow the Arduino IDE configuration the program needs to know where is they configuration files.  There’s a simple way to do that.

Still in the Project Properties window select Run at Categories panel. At Working Directory click in the Browse button and select the directory of your Arduino IDE. Mine is at /home/silveira/arduino-0013.

Working directory

You can close now the Project Properties window. At this moment in autocomplete for these libraries are enable in your code.

netbeans autocomplete

Step 6) Codding and running

Here is the code you can replace at Main.java in your project:

package serialtalk;

import gnu.io.CommPortIdentifier;
import gnu.io.SerialPort;
import java.io.InputStream;
import java.io.OutputStream;
import processing.app.Preferences;

public class Main {
    static InputStream input;
    static OutputStream output;

    public static void main(String[] args) throws Exception{
        Preferences.init();
        System.out.println("Using port: " + Preferences.get("serial.port"));
        CommPortIdentifier portId = CommPortIdentifier.getPortIdentifier(
                Preferences.get("serial.port"));

        SerialPort port = (SerialPort)portId.open("serial talk", 4000);
        input = port.getInputStream();
        output = port.getOutputStream();
        port.setSerialPortParams(Preferences.getInteger("serial.debug_rate"),
                SerialPort.DATABITS_8,
                SerialPort.STOPBITS_1,
                SerialPort.PARITY_NONE);
        while(true){
            while(input.available()>0) {
                System.out.print((char)(input.read()));
            }
        }
    }
}

Now just compile and run (with your Arduino attached in your serial port and running the program of step 2).

voillá

There is. Now you can make your Java programs to talk with your Arduino using a IDE like NetBeans to create rich interfaces.