Skip to content

Tag: netbeans

JavaFX 1.1 for Linux workaround

Download

javafx4linux.tar.bz2 (~ 36Mb).

Installing

1) Extract the javafx4linux.tar.bz2 file. In this example I’m placing it on my Desktop. After the installing process you can remove it.

javafx linux ubuntu extract

2) Open your NetBeans 6.5 and go at Tools → Plugins and go to Downloaded tab. In a plain and new NetBeans installation there will be no plugin in this tab yet.

netbeans javafx linux step01

netbeans javafx linux step02

netbeans javafx linux step03

3) Click on the Add Plugins button and head to the directory you extracted the file and select all .nbm files.

netbeans javafx linux step 04

4) You will see a list of 22 plugins selected. Click on the Install button.

netbeans javafx linux step 05

5) Just keep clicking on the Next button.

netbeans javafx linux step 6

6) Check the license agreement accept box.

netbeans javafx linux step 7

7) You’ll see a warning because the Linux pluggin is not signed. Don’t worry, just click Continue.

netbeans javafx linux step 8

8) Click on Finish to restart NetBeans.

netbeans javafx linux step 9

9) Now we can test it. Go at File → New Project, select the JavaFX on Categories and JavaFX Script Application on Projects.

netbeans javafx linux step 10

10) Put some code and run it. There is. JavaFX on Linux.

netbeans javafx linux step 11

Considerations

This is not a official of JavaFX for Linux! This solution was tested on Ubuntu 9.04 “Jaunty Jackalope” with Java 6 update 13 and NetBeans 6.5.1, but should also work with others Linux distributions and Java versions greater than 5.

Known bugs

As a non official workaround for JavaFX for Linux you may notice some drawbacks. Some parts of the JavaFX runtime rely on native implementations on the specific operational system. You may not use some multimedia capabilities as video playback, JavaFX Mobile emulator and some performance issues in some effects. Despite that, is perfectly possible to develop applications using JavaFX on NetBeans.

Thanks

I’d like to thanks some guys around the world. Weiqi Gao’s original post on JavaFX on Linux, HuaSong Liu article on DZone and Kaesar Alnijres post.

Arduino and Java

Arduino

Arduino is a free popular platform for embedded programming based on a simple I/O board easily programmable. Interfacing it with Java allow us to create sophisticated interfaces and take advantages from the several API available in the Java ecosystem.

I’m following the original Arduino and Java interfacing tutorial by Dave Brink but in a more practical approach and with more details.

Step 1) Install the Arduino IDE

This is not a completely mandatory step but it will easy a lot our work. Our program will borrow some Arduino IDE libraries and configurations  like which serial port it is using and at which boud rate. At the moment I wrote this tutorial the version of Arduino IDE was 0013.

Step 2) Prepare your Arduino

Connect your Arduino to the serial port in your computer. Here I’m connecting my Arduino with my laptop throught a USB.

Arduino

Make sure your Arduino IDE is configured and communicating well if your Arduino. Let put on it a little program that sends to us a mensage:

void setup(){
  Serial.begin(9600);
}

void loop(){
  Serial.println("Is there anybody out there?");
  delay(1000);
}

Step 3) Install RXTX Library

We will use some libraries to acess the serial port, some of them relies on binary implementations on our system. Our first step is to install the RXTX library (Java CommAPI) in your system. In a Debian like Linux you can do that by:

sudo apt-get install librxtx-java

Or using a graphical package tool like Synaptic:

installing rxtx

For others systems like Windows see the RXTX installation docs.

Step 4) Start a new NetBeans project

Again, this is not a mandatory step but will easy a lot our work. NetBeans is a free and open source Java IDE that will help us to develop our little application. Create a new project at File → New Project and choose at Java at Categories and Java Application at Projects.

netbeans new project

Chose a name for your project. I called mine SerialTalker.

name your project

At the moment I wrote this tutorial I was using Netbeans version 6.5 and Java 6 update 10 but should work as well on newer and some older versions

Step 5) Adding Libraries and a Working Directory

On NetBeans the Projects tab, right-click your project and choose Properties.

libraries

On the Project Properties window select the Libraries on the Categories panel.

Netbeans project libraries

Click the Add JAR/Folder button.

arduino directory

Find where you placed your Arduino IDE installation. Inside this directory there’s a lib directory will some JAR files. Select all them and click Ok.

jars libraries

As we want to borrow the Arduino IDE configuration the program needs to know where is they configuration files.  There’s a simple way to do that.

Still in the Project Properties window select Run at Categories panel. At Working Directory click in the Browse button and select the directory of your Arduino IDE. Mine is at /home/silveira/arduino-0013.

Working directory

You can close now the Project Properties window. At this moment in autocomplete for these libraries are enable in your code.

netbeans autocomplete

Step 6) Codding and running

Here is the code you can replace at Main.java in your project:

package serialtalk;

import gnu.io.CommPortIdentifier;
import gnu.io.SerialPort;
import java.io.InputStream;
import java.io.OutputStream;
import processing.app.Preferences;

public class Main {
    static InputStream input;
    static OutputStream output;

    public static void main(String[] args) throws Exception{
        Preferences.init();
        System.out.println("Using port: " + Preferences.get("serial.port"));
        CommPortIdentifier portId = CommPortIdentifier.getPortIdentifier(
                Preferences.get("serial.port"));

        SerialPort port = (SerialPort)portId.open("serial talk", 4000);
        input = port.getInputStream();
        output = port.getOutputStream();
        port.setSerialPortParams(Preferences.getInteger("serial.debug_rate"),
                SerialPort.DATABITS_8,
                SerialPort.STOPBITS_1,
                SerialPort.PARITY_NONE);
        while(true){
            while(input.available()>0) {
                System.out.print((char)(input.read()));
            }
        }
    }
}

Now just compile and run (with your Arduino attached in your serial port and running the program of step 2).

voillá

There is. Now you can make your Java programs to talk with your Arduino using a IDE like NetBeans to create rich interfaces.

Tirei a SCSNI

duke pulando

Já fazem algumas semanas que chegou o resultado, mas eu não tive tempo de postar. Eu passei na prova da certificação SCSNI (Sun Certified Specialist for NetBeans IDE) durante a fase beta do exame. A notícia foi uma surpresa porque depois da prova eu realmente tinha achado que tinha levado bomba. Mas como a prova era beta, ainda não estava definido qual ia ser a nota de corte, percentual mínimo que devia ser alcançado para você saber se passou ou não.

A certificação SCSNI cobre tópicos de configuração da IDE, setup de projetos, desenvolvimento Java SE, desenvolvimento Java Web EE, edição, testes, sondagem e depuração. Felizmente certificação não cobre toda as linguagens e plataformas que o NetBeans atualmente suporte e também deixa de fora a parte de plataforma. No entando é necessário saber o que é e o que não é suportado.

duke sun certified specialist for netbeans ide

Para quem pretende tirar essa certificação no futuro algumas dicas e links úteis:

  • O grande Wagner Santos, que escreve o Net Feijão, fez um excelente guia para a prova, vale muito a pena dar uma olhada.
  • Eu também postei um pequeno guia para prova. Ainda tem vários tópicos incompletos mas pode ser útil.
  • Tenha sempre a mão documentação do NetBeans é bastante vasta e cobre mais do que o necessário para a prova.
  • Assista todos os screencasts do NetBeans. Muitas ds coisas que você precisa saber são mais fáceis de aprender vendo fazer do que lendo como faz. Depois de ver o screencast, tente reproduzir a aula. Há também o NetBeans TV que reune vários vídeos e tutoriais relacionados ao NetBeans.
  • Há no wiki do NetBeans uma guia de estudo com uma lista de materiais interessantes para a prova.

JavaFX, Simple Tile Set

Tile sets are a very simple way to draw scenarios with repeated elements. From simple to complex ones using a very low footprint.

First step, load the png file that stores the tileset into a Image. The file tiles.png shoud be in the same directory of the source code. I adjusted some tiles from those tile set I’ve blogged here before into a grid of 10×10 tiles.

Set of tiles, example

var tileset = Image {
   url: "{__DIR__}tiles.png"
}

Notice that each tile have 32 of height and 32 of width. We will assume this and use theses numbers when performing calculations to find a single tile in our tile set.

def w = 32;
def h = 32;

To display a Image in the screen we use a ImageView node. A ImageView can have a viewport property to create crop or zoom effect. A viewport is just a Rectangle2D, a object with position (minX and minY), height and width. If we want to display the first tile in the tileset we do

first tile

ImageView {
   image: tileset
   viewport: Rectangle2D{
      minX: 0, minY: 0, height: 32, width: 32
   }
}

Notice that the minX determines the column and minY the row in the tileset. The first row is 0*32, the second row is 1*32 and so on. If we want to display the tile at the second line and third column of the tileset we do

another_tile

ImageView {
   image: tileset
   viewport: Rectangle2D{
      minX: 2 * 32 , minY: 1*32, height: 32, width: 32
   }
}

Those properties in a Rectangle2D are for init and read only. So I created a list with all Rectangles I can need for use as a viewport.

def viewports = for (row in [0..9]) {
   for (col in [0..9]) {
       Rectangle2D{
           minX: col * w, minY: row * h, height: w, width: h
       }
   }
}

The scenario map is stored in another list. The first element of the list is 7, that is, the first tile in the scenario is the 7th tile from the tile set.

var map = [
    7,  3,  3,  3,  3,  3,  3,  3,  3,  8,
   19, 26, 40, 41, 24, 13, 13, 23, 24, 19,
   19, 36, 50, 51, 34,  2,  2,  2, 34, 19,
   19,  2,  2,  2,  2,  2,  2,  2, 25, 19,
   19, 57, 58, 44, 45, 46,  2,  2, 35, 19,
   27,  3,  3,  6, 55, 56,  5,  3,  3, 38,
   19, 60, 13, 16, 47, 48, 15, 13, 61, 19,
   19, 70,  1, 33,  1,  1,  1,  1, 71, 19,
   19,  1,  1,  1,  1,  1,  1,  1, 49, 19,
   17,  9,  9,  9,  9,  9,  9,  9,  9, 18,
];

Finally to create a scenario with 100 tiles, 10 per row and with 10 rows, in a list called tiles. Each iteration of this loop creates a ImageView. Each ImageView will store a single tile. We get the tile number in the map list and so use it to index the viewports list.

var tiles =  for (row in [0..9]) {
   for (col in [0..9]) {
      ImageView {
         x: col * w, y: row * h,
         viewport: bind viewports[map[row * 10 + col]]
         image: tileset
      }
   }
}

Additionally I added two things to transform this program also in a (extremely)  simple map editor. At each ImageView I added a callback for onMouseClicked event. When you click on a tile, it changes its map position, ie, the tile. The next tile for the left button and the last tile for any other button.

onMouseClicked: function( e: MouseEvent ):Void {
   var amount = if(e.button == MouseButton.PRIMARY) { 1 } else { -1 };
   map[row * 10 + col] = (map[row * 10 + col] + amount) mod 100;
}

The other thing is to print the map list when the program is over. There is the full program:

package tileeditor;

import javafx.stage.Stage;
import javafx.scene.Scene;
import javafx.scene.image.ImageView;
import javafx.scene.image.Image;
import javafx.scene.CustomNode;
import javafx.scene.Group;
import javafx.scene.Node;
import javafx.geometry.Rectangle2D;
import javafx.scene.input.MouseEvent;
import javafx.scene.input.MouseButton;

def w = 32;
def h = 32;

var map = [
    7,  3,  3,  3,  3,  3,  3,  3,  3,  8,
   19, 26, 40, 41, 24, 13, 13, 23, 24, 19,
   19, 36, 50, 51, 34,  2,  2,  2, 34, 19,
   19,  2,  2,  2,  2,  2,  2,  2, 25, 19,
   19, 57, 58, 44, 45, 46,  2,  2, 35, 19,
   27,  3,  3,  6, 55, 56,  5,  3,  3, 38,
   19, 60, 13, 16, 47, 48, 15, 13, 61, 19,
   19, 70,  1, 33,  1,  1,  1,  1, 71, 19,
   19,  1,  1,  1,  1,  1,  1,  1, 49, 19,
   17,  9,  9,  9,  9,  9,  9,  9,  9, 18,
];

var tileset = Image {
    url: "{__DIR__}tiles.png"
}

def viewports = for (row in [0..9]) {
   for (col in [0..9]) {
       Rectangle2D{
           minX: col * w, minY: row * h, height: w, width: h
       }
   }
}

var tiles =  for (row in [0..9]) {
   for (col in [0..9]) {
      ImageView {
         x: col * w, y: row * h,
         viewport: bind viewports[map[row * 10 + col]]
         image: tileset

         onMouseClicked: function( e: MouseEvent ):Void {
            var amount = if(e.button == MouseButton.PRIMARY) { 1 } else { -1 };
            map[row * 10 + col] = (map[row * 10 + col] + amount) mod 100;
         }
      }
   }
}

Stage {
    title: "JavaFX Simple Tile Editor"
    scene: Scene {
        content: [ tiles ]
    }
    onClose: function() {
        println(map);
    }
}

Here is the result for that map
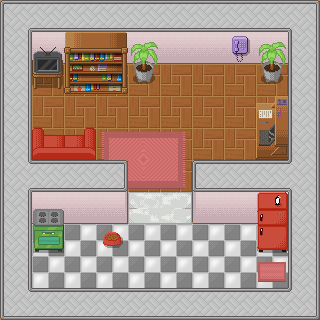
tlemap javafx

And you can try it yourself in your browser. Play it online now.

Here is a video of it working

[youtube]lxuBEoItB5E[/youtube]

Downloads:

Possibilities

We are using just  a image that can handle 100 tiles, tiles.png with less than 30Kb. The map is also composed with 100 tiles. Each tile we can choose between 100 different tiles, so we can compose 10100 different maps (one googol10 ). Most of them are useless and without any sense, but some are cool. 🙂

NetBeans, palestra ao vivo

Estamos experimento uma coisa nova dentro do OSUM. Vamos começar a fazer os webinars, palestras ao vivo pela internet, agora em outras linguas além do Inglês.

Eu vou ministrar o primeiro em português amanhã, aqui está o relese:

Nós estamos introduzindo para os membros do OSUM seminários web ao vivo para prover treinamento em tempo real nas últimas tecnologias de Software Livre.

Temos o prazer de começar nossa série de seminários web com esta sessão sobre o recém lançado NetBeans 6.5.

Este seminário web vai introduzir as novas funcionalidades do NetBeans 6.5 como:
→ Suporte robusto a PHP e JavaScript
→ Depuração para Groovy a Grails
→ Novas melhorarias para Java, Ruby e Rails, e desenvolvimento em C/C++
→ Suporte nativo para Hibernate, importação de projetos Eclipse, e a compilação ao salvar.

Este seminário web também proverá uma demonstração detalhada das capacidades de edição da IDE NetBeans e o famoso Construtor de Interfaces Swing (Matisse).

Este seminário será conduzido por Silveira Neto, Embaixador de Campus da Sun em Fortaleza, Ceará, membro do CEJUG (Ceará Java User Group), desenvolver e entusiasta de tecnologias de Software Livres.

Este seminário web será conduzido em Português. Por favor, consulte o Calendário de Eventos do OSUM para informações da mesma seção em outras línguas.

Este seminário web está marcado para o dia 25 de Novembro de 2008 as 20:00 no horário de Fortaleza, Ceará (UTC -3:00).
Isso corresponde a:
→ 21:00 em São Paulo, Rio e demais estados de mesmo fuso horário do Ceará mas com horário de verão em vigência.
→ 23:00 em UTC (Greenwich).

Por favor use o World Clock Meeting Planner para ajustar esse horário para sua localidade.

Este seminário web será conduzido usando o Elluminate Live! Você poderá escutar ao vivo o áudio nos auto-falantes ou fones de ouvido de seu computador e poderá fazer perguntas através do bate-papo em texto. Use o link URL provido no campo “Website or map” da seção. Por favor entre de 5 a 10 minutos antes para a configurar propriamente sua seção. Para maiores informações e requisitos mínimos do sistema use o Elluminate

Página do evento dentro do OSUM.

Link para assistir ao vivo via Elluminate.

Aviso: House um erro durante a marcação da seção. Eu marquei que era de Fortaleza no Brasil mas o sistema do Elluminate entendeu que meu horário era o de Brasília, então ao invés de marcado para as 23:00 em UTC ficou marcado para 22:00 em UTC. Não houve tempo suficiente para eu avisar a todos então eu tive que começar no horário errado mesmo. Ainda assim houve uma boa participação, contamos com umas 15 pessoas e tudo ocorreu bem. Muita gente me disse que tentou entrar e não conseguiu então vou tentar fazer um bis dessa apresentação. Os slides que eu usei e a gravação serão divulgados em breve. Obrigado a todos e me desculpem pelo transtorno.

Inkscape and JavaFX working together

Inkscape is a open source cross-platform vector graphics editor application that I use daily to create draws.

When Project Nile was launched, me and some others guys complained about lack of open source alternatives in the workflow of creation with JavaFX. So we developed a module inside Inkscape that converts your SVG drawings to JavaFX code.

Features

  • Both are free and open source technologies, providing more tools on a powerful workflow for programmers and designers to develop Rich Internet Applications.
  • Comes natively with Inkscape. Install Inkscape an have JavaFX exporting out-of-the-box. No needing to install external plugins.
  • Provides a way to Inkscape users to make RIA applications reusing their work at drawing tool.
  • Provides a way to JavaFX programmers a tool for designers their graphics and interfaces.
  • Keep separated the JavaFX programming logic from the graphics resources but also provide a way to connect them.
  • They work on Windows, Mac OS, Linux, OpenSolaris and FreeBSD.

Workflow Example

I’ll show here step by step how would be a designer-developer workflow from designing graphical elements, such interfaces, to integrating it to a JavaFX Script code in NetBeans. In this example I’m using Inkscape 0.46-devel, build from the unstable sources and NetBeans 6.1 with the JavaFX module. See here how to build Inkscape from sources and here how to do some optimizations on the build.

Here’s a artwork (a modified version from another one I did in another post) made with Inkscape.

Doesn’t matter the complexity of the drawing it is made of discrete elements such circles, rectangles, paths and others. What the exporting module does is converting these SVG elements into JavaFX Scene Graph API elements.

To do that just click on File → Save As… or Shift+Ctrl+S.

Select JavaFx as the output format.

And chose a name. I’m saving the drawing as Girl.fx.

Now the drawing is a JavaFX class that extends from CustomNode. Once in your classpath (in this case the same directory of your main code) you can call it.

Girl{}

Another example, the famous SVG tiger.

Tiger{}

Actually, you can get the elements of your drawing as attributes nodes of the main node. We use the name you gave to your object to name the attributes.

import javafx.scene.paint.Color;
var girl = Girl{}
girl.rightiris.fill = Color.LIME;
girl.fringe.fill = Color.WHITE;
girl.backhair.fill = Color.DARKGRAY;
girl.hair.fill = Color.GRAY;

import javafx.scene.paint.Color;
var girl = Girl{}
girl.rightiris.fill = Color.GREEN;
girl.backhair.fill = Color.DARKRED;
girl.hair.fill = Color.RED;

You can also put event handling by code.

import javafx.input.MouseEvent;
var p = Player{}
p.x.onMouseClicked = function( e: MouseEvent ):Void {
java.lang.System.exit(0);
}

As a ordinary JavaFX Node, you can do whatever you do with a Node, like using it inside a application or applying effects or transformations.

import javafx.application.Frame;
import javafx.application.Stage;
import javafx.scene.effect.SepiaTone;

var girl = Girl{
   scaleX: 0.5
   scaleY: 0.5
   effect: SepiaTone{}
}

Frame {
   visible: true
   stage: Stage {
      content: [girl]
   }
}

Using this approach you can have the reference and total control under all those elements that compose your drawing. You can design complete interfaces and attach event handling by code.

Source code

The module is already on the main Inkscape dev tree and working properly. I guess it will be officially released to all users in the next Inkscape release.

Still to do

  • Fix some problems with strokes.
  • Fix some problems in the gradients.
  • Use Zlib to create jfd files when the structure is too big.
  • Provide a dynamic method like getElementById in JavaScript.
  • Convert effects like blur to JavaFX effects.
  • There are some i18n errors in the module to be fixed.
  • Finish the adaption from Paths to SVGPaths.
  • Finish the adaption to the new JavaFX 1.0 syntax (coming December, 2).

Thanks!

Thanks for all guys that worked on this module and also on the projects Inkscape and JavaFX. Specially thanks for Bob Jamison, Jim Clarke, Joshua Marinacci and others. That’s my first contribution to a big free software, I’m very glad and I want to do much more. 😀

JavaFX, Defuse the Bomb

I continue to develop simple games demos to feel better the strengths and weakness of JavaFX for game development.

Preview:

[youtube]hR2LiKiBUgE[/youtube]

Click to play via Java Web Start:

There’s a little JavaFX game demo where you have to transport a bomb to a defuse point without touching in the walls. I’m using the collision detection methods I described early in this post to detect when the bomb hits a wall and then explode or when a bomb is inside the defuse point and the game ends. As it’s only a demo, it’s just one single level, but adding more levels would be easy.

Basically we have this four images:


bomb.png


goal.png


floor.png


wall.png

The code is petty simple. A little bit more than 300 lines with even with all comments and declarations. I transform the bomb image into a draggable node, create a list of collidable nodes and a especial node, the goal. I check the collisions when the bomb is dragged by mouse, if it hits something, it blows up.

I use extensively the TimeLine class from the animation framework (javafx.animation) to create chained animations and even to control some game logic.

As I focused in the simplicity, I don’t declared any classes to after instantiate their objects. I just was using common classes from JavaFX and putting logic on ir throught event and binding to external variables.

import javafx.application.Frame;
import javafx.application.Stage;
import javafx.animation.Timeline;
import javafx.animation.KeyFrame;
import javafx.animation.Interpolator;
import javafx.scene.image.ImageView;
import javafx.scene.image.Image;
import javafx.scene.Group;
import javafx.scene.Node;
import javafx.scene.paint.Color;
import javafx.scene.geometry.Circle;
import javafx.scene.geometry.Rectangle;
import javafx.scene.geometry.Shape;
import javafx.scene.text.Text;
import javafx.scene.Font;
import javafx.scene.FontStyle;
import javafx.input.MouseEvent;

/* Fade variable modified in some animations and used in the fadescreen */
var fade = 0.0;

/* The Bomb */
var lock = false;
var tx = 0.0;
var ty = 0.0;
var bomb:Node = Group{
    opacity: bind bombfade;
    content: [
        ImageView {
            image: Image {
                url: "{__DIR__}/bomb.png"
            }
        },
        Circle {
            centerX: 45, centerY: 21, radius: 7, fill: Color.LIME
            opacity: bind led
        },
        Circle {
            centerX: 30, centerY: 30, fill: Color.WHITE
            radius: bind fireradius
        },
    ],
    var startX = 0.0;
    var startY = 0.0;
    translateX: bind tx
    translateY: bind ty

    onMousePressed: function( e: MouseEvent ):Void {
        if (lock) {return;}
        startX = e.getDragX() - tx;
        startY = e.getDragY() - ty;
    }

    onMouseDragged: function(e:MouseEvent):Void {
        if (lock) {return;}
        tx = e.getDragX() - startX;
        ty = e.getDragY() - startY;
        checkcollissions();
    }
}

/* Big rectangle that covers all the screen (bomb explosion or game end) */
var fadescreen = Rectangle {
    x: 0, y: 0, width: 640, height: 480, fill: Color.WHITE
    opacity: bind fade
}

/* The wood floor image for the scenario. */
var floor = ImageView {
    image: Image {
        url: "{__DIR__}/floor.png"
    }
}

/* The goal image where the bomb should be placed. */
var goal = ImageView {
    x: 470, y: 360
    image: Image {
        url: "{__DIR__}/goal.png"
    }
}

/* List of obstacles nodes that the bomb can collide with. */
var obstacles = [
    Rectangle { x: 120, y: 0, width: 100, height: 300, fill: Color.BLACK},
    Rectangle { x: 350, y: 200, width: 100, height: 300, fill: Color.BLACK},
    Rectangle { x: 370, y: 50, width: 50, height: 50, fill: Color.BLACK},
    Rectangle {
        x: 250, y: 120, translateX: bind move, width: 100, height: 50
        fill: Color.BLACK
    },
];

/* Visible representations of obstacles */
var wallimage = Image {
    url: "{__DIR__}/wall.png"
}
var walls = for(obs in obstacles){
    ImageView {
        x: obs.x, y: obs.y, translateX: bind obs.translateX
        clip: obs, image: wallimage
    }
}

/* Animation for a blinking green led */
var led = 0.0;
var bombclock = Timeline {
    repeatCount: Timeline.INDEFINITE
    autoReverse: true
    keyFrames : [
        KeyFrame {
            time : 0s
            values : led => 0.0 tween Interpolator.LINEAR
        },
        KeyFrame {
            time : 1s
            values : led => 1.0 tween Interpolator.LINEAR
        }
    ]
}

/* Animation for the bomb explosion and game reset */
var fireradius = 0.0;
var explosion:Timeline = Timeline {
    repeatCount: 1
    keyFrames : [
        KeyFrame {
            time : 0s
            values : [
                fireradius => 0.0,
                fade => 0.0
            ]
        },
        KeyFrame {
            time : 2s
            values : [
                fireradius => 200.0 tween Interpolator.LINEAR,
                fade => 1.0 tween Interpolator.LINEAR
            ]
            action: gamereset
        },
        KeyFrame {
            time : 3s
            values: fade => 0.0 tween Interpolator.LINEAR
        },
    ]
}

/* Reset variables for initial values */
function gamereset(){
    lock = false;
    fireradius = 0.0;
    tx = 0.0;
    ty = 0.0;
    bombfade = 1.0;

    moveblock.start();
    specialcollison.start();
    bombclock.start();
}

/* Animation when the bomb reaches the goal. Bomb disapear. */
var bombfade = 1.0;
var bomdisapear = Timeline {
    repeatCount: 1
    keyFrames : [
        KeyFrame {
            time : 1s
            values: [
                        bombfade => 0.0 tween Interpolator.EASEBOTH,
                        fade => 0.0
            ]
        },
        KeyFrame {
            time : 2s
            values:
                    fade => 1.0 tween Interpolator.LINEAR;
            action: gamereset
        },
        KeyFrame {
            time : 3s
            values:
                    fade => 0.0 tween Interpolator.LINEAR;
        },
    ]
}

/* Animation for a moving block. */
var move = 0.0;
var moveblock = Timeline {
    repeatCount: Timeline.INDEFINITE
    autoReverse: true
    keyFrames : [
        KeyFrame {
            time : 0s
            values :
                    move => 0.0
        },
        KeyFrame {
            time : 3s
            values :
                    move => 200.0 tween Interpolator.EASEBOTH
        },
    ]
}

/* Check and handle possible collisions. */
function checkcollissions(): Void {
    if(checkobstacles()){
        lock = true;
        specialcollison.stop();
        moveblock.stop();
        explosion.start();
    }

    if (insidenode(bomb,goal)) {
        lock = true;
        moveblock.stop();
        bomdisapear.start();
    }
}

/* There was a bug, when the bomb is stopped, not been gragged, in front of
the moving block, it could pass through it because checkcollissions() was
only called on mouse moving. This make sure checking this special case. */
var specialcollison:Timeline = Timeline {
    repeatCount: Timeline.INDEFINITE
    keyFrames : [
        KeyFrame {
            time : 1s/5
            action: function(){
                if(hitnode(obstacles[sizeof obstacles-1], bomb)){
                    lock = true;
                    moveblock.stop();
                    explosion.start();
                    specialcollison.stop();
                }
            }
        }
    ]
}

/*
* The next four functions are for collision detection.
* @See http://silveiraneto.net/2008/10/30/javafx-rectangular-collision-detection/
*/

/*
 * Check collision between two rectangles.
 */
function collission(ax, ay, bx, by, cx, cy, dx, dy): Boolean {
    return not ((ax > dx)or(bx < cx)or(ay > dy)or(by < cy));
}

/*
 * Check if the first rectangle are inside the second.
 */
function inside (ax, ay, bx, by, cx, cy, dx, dy):Boolean{
    return ((ax > cx) and (bx < dx) and (ay > cy) and (by < dy));
}

function hitnode(a: Node, b:Node): Boolean {
    return (collission(
        a.getBoundsX(), a.getBoundsY(),
        a.getBoundsX() + a.getWidth(), a.getBoundsY() + a.getHeight(),
        b.getBoundsX(), b.getBoundsY(),
        b.getBoundsX() + b.getWidth(), b.getBoundsY() + b.getHeight()
    ));
}

function insidenode(a:Node,b:Node):Boolean {
    return (inside(
        a.getBoundsX(), a.getBoundsY(),
        a.getBoundsX() + a.getWidth(), a.getBoundsY() + a.getHeight(),
        b.getBoundsX(), b.getBoundsY(),
        b.getBoundsX() + b.getWidth(), b.getBoundsY() + b.getHeight()
    ));
}

/*
* Check collision of bomb against each obstacle.
*/
function checkobstacles(): Boolean{
    for(obst in obstacles){
        if (hitnode(obst, bomb)){
            return true;
        }
    }
    return false;
}

/* Pack visual game elements in a Frame's Stage, unresizable. */
Frame {
    title: "Defuse the Bomb"
    width: 640
    height: 480
    resizable: false
    closeAction: function() {
        java.lang.System.exit( 0 );
    }
    visible: true

    stage: Stage {
        content: bind [floor, goal, walls, bomb, fadescreen]
    }
}

/* Call gamereset to set initial values and start animations */
gamereset();

Downloads:

JavaFX, rectangular collision detection

[youtube]NRwRTHPGg6M[/youtube]

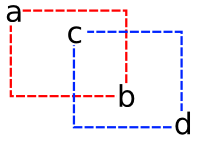
In a game I wrote some years ago we handled simple rectangular collisions. Given the points:

We did:

// returning 0 means collision
int collision(int ax, int ay, int bx, int by, int cx, int cy, int dx, int dy){
	return ((ax > dx)||(bx < cx)||(ay > dy)||(by < cy));
}

I'll show here a little demo about how implement simple rectangular collisions on JavaFX.
First I created a movable rectangle using the same idea of draggable nodes I already had posted before.

import javafx.input.MouseEvent;
import javafx.scene.geometry.Rectangle;

public class MovableRectangle extends Rectangle {
    private attribute startX = 0.0;
    private attribute startY = 0.0;

    public attribute onMove = function(e:MouseEvent):Void {}

    override attribute onMousePressed = function(e:MouseEvent):Void {
        startX = e.getDragX()-translateX;
        startY = e.getDragY()-translateY;
        onMove(e);
    }

    override attribute onMouseDragged = function(e:MouseEvent):Void {
        translateX = e.getDragX()-startX;
        translateY = e.getDragY()-startY;
        onMove(e);
    }
}

In the main code I some important things:

  • colide, a color that represents the collision effect. White means no collision and gray means collision.
  • rec1 and rec2, the two rectangles that can collide.
  • checkcollision() the function that checks and handles a possible collision.

Here is the main code:

import javafx.application.Frame;
import javafx.application.Stage;
import javafx.scene.geometry.Rectangle;
import javafx.scene.paint.Color;
import javafx.input.MouseEvent;

var colide = Color.WHITE;

function checkcollision():Void {
    if (
        (rec1.getBoundsX() > rec2.getBoundsX() + rec2.getWidth()) or
        (rec1.getBoundsX() + rec1.getWidth() < rec2.getBoundsX()) or 
        (rec1.getBoundsY() > rec2.getBoundsY() + rec2.getHeight()) or 
        (rec1.getBoundsY() + rec1.getHeight() < rec2.getBoundsY())
    ) {
        colide = Color.WHITE
    } else {
        colide = Color.LIGHTGRAY
    }
}

var rec1: MovableRectangle = MovableRectangle {
    x: 10, y: 10, width: 50, height: 60, fill: Color.RED
    onMove: function(e:MouseEvent):Void {
        checkcollision()
    }
}

var rec2: MovableRectangle = MovableRectangle {
    x: 100, y: 100, width: 70, height: 30, fill: Color.BLUE
    onMove: function(MouseEvent):Void {
        checkcollision()
    }
}
Frame {
    title: "Rectangular Collisions", width: 300, height: 300
    closeAction: function() { 
        java.lang.System.exit( 0 ); 
    }
    visible: true

    stage: Stage {
        fill: bind colide
        content: [rec1, rec2]
    }
}

Try it via Java Web Start:

Java Web Start

Some considerations:

  • You can use rectangular collisions to create bounding boxes to handle collisions in more complex shapes or sprites. Is a common approach in 2d games to avoid more expensive calculations.
  • There are space for optimizations.
  • In this case I'm using only two objects. Some problems raises when I have N objects to handle.

More generally, we can code:

function collission(ax, ay, bx, by, cx, cy, dx, dy): Boolean {
    return not ((ax > dx)or(bx < cx)or(ay > dy)or(by < cy));
}

function hitnode(a: Node, b:Node): Boolean{
    return (collission(
        a.getBoundsX(), a.getBoundsY(),
        a.getBoundsX() + a.getWidth(), a.getBoundsY() + a.getHeight(),
        b.getX(), b.getY(),
        b.getX() + b.getWidth(), b.getY() + b.getHeight()
    ));
}

This way we can pass just two bounding boxes to hitnode and easily check collision of a node against a list of bounding boxes nodes.
Using the same approach I also wrote this function to test if a Node is inside another Node:

function inside (ax, ay, bx, by, cx, cy, dx, dy):Boolean{
    return ((ax > cx) and (bx < dx) and (ay > cy) and (by < dy));
}

function insidenode(a:Node,b:Node):Boolean{
    return (inside(
        a.getBoundsX(), a.getBoundsY(),
        a.getBoundsX() + a.getWidth(), a.getBoundsY() + a.getHeight(),
        b.getBoundsX(), b.getBoundsY(),
        b.getBoundsX() + b.getWidth(), b.getBoundsY() + b.getHeight()
    ));
}

Soon I'll post game examples showing how to use this method and others collission detection methods.

Downloads:

Ainda essa semana

Ainda essa semana eu vou fazer três palestras. Olhe aí se você não vai estar por perto. 😉

  • 29/10 – Quarta-feira 20:30 – Palestra sobre NetBeans no na VII Semana de TI e Telecomunicações da FIC.
  • 30/10 – Sexta-feira 09:30 – Palestra sobre OpenSolaris também na VII Semana de TI e Telecomunicações da FIC.
  • 01/11Sábado 15:20 – Palestra Apresentando o CEJUG e o poder do Java em Iguatu no Encontro PHP & Java.