Skip to content

Tag: programming

BumbaBot-1

I got a simple motor from a broken domestic printer. It’s a Mitsumi m355P-9T stepping motor. Any other common stepping motor should fits. You can find one in printers, multifunction machines, copy machines, FAX, and such.

bumbabot v01

With a flexible cap of water bottle with a hole we make a connection between the motor axis and other objects.

bumbabot v01

bumbabot v01

With super glue I attached to the cap a little handcraft clay ox statue.

bumbabot v01

It’s a representation from a Brazilian folkloric character Boi Bumbá. In some traditional parties in Brazil, someone dress a structure-costume and dances in circular patterns interacting with the public.

776513346_c31db6843b_m

2246467684_49164d3397_m
Photos by Marcus Guimarães.

Controlling a stepper motor is not difficult.  There’s a good documentation on how to that on the Arduino Stepper Motor Tutorial. Basically it’s about sending a logical signal for each coil in a circular order (that is also called full step).

full step

Animation from rogercom.com.

stepper motor diagram

You’ll probably also use a driver chip ULN2003A or similar to give to the motor more current than your Arduino can provide and also for protecting it from a power comming back from the motor. It’s a very easy find this tiny chip on electronics or automotive  stores or also from broken printers where you probably found your stepped motor.

Arduino Stepper Motor UNL2003A

With a simple program you can already controlling your motor.

// Simple stepped motor spin
// by Silveira Neto, 2009, under GPLv3 license
// http://silveiraneto.net/2009/03/16/bumbabot-1/
int coil1 = 8;
int coil2 = 9;
int coil3 = 10;
int coil4 = 11;
int step = 0;
int interval = 100;

void setup() {
  pinMode(coil1, OUTPUT);
  pinMode(coil2, OUTPUT);
  pinMode(coil3, OUTPUT);
  pinMode(coil4, OUTPUT);
}

void loop() {
  digitalWrite(coil1, step==0?HIGH:LOW);
  digitalWrite(coil2, step==1?HIGH:LOW);
  digitalWrite(coil3, step==2?HIGH:LOW);
  digitalWrite(coil4, step==3?HIGH:LOW);
  delay(interval);
  step = (step+1)%4;
}


Writing a little bit more generally code we can create function to step forward and step backward.

My motor needs 48 steps to run a complete turn. So 360º/48 steps give us 7,5º per step. Arduino has a simple Stepper Motor Library but it doesn’t worked with me and it’s also oriented to steps and I’d need something oriented to angles instead. So I wrote some routines to do that.

For this first version of BumbaBot I mapped angles with letters to easy the communication between the programs.

motor angle step control

Notice that it’s not the final version and there’s still some bugs!

// Stepped motor control by letters
// by Silveira Neto, 2009, under GPLv3 license
// http://silveiraneto.net/2009/03/16/bumbabot-1/

int coil1 = 8;
int coil2 = 9;
int coil3 = 10;
int coil4 = 11;

int delayTime = 50;
int steps = 48;
int step_counter = 0;

void setup(){
  pinMode(coil1, OUTPUT);
  pinMode(coil2, OUTPUT);
  pinMode(coil3, OUTPUT);
  pinMode(coil4, OUTPUT);
  Serial.begin(9600);
}

// tells motor to move a certain angle
void moveAngle(float angle){
  int i;
  int howmanysteps = angle/stepAngle();
  if(howmanysteps<0){
    howmanysteps = - howmanysteps;
  }
  if(angle>0){
    for(i = 0;i

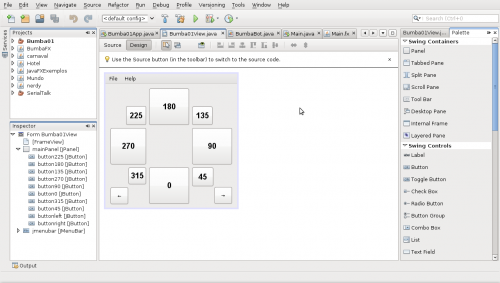
In another post I wrote how create a Java program to talk with Arduino. We'll use this to send messages to Arduino to it moves. 

captura_de_tela-bumba01-netbeans-ide-65

[put final video here]

To be continued... :)

Morse Code Translator with Arduino

You write in your computer, sends a message thought USB and Arduino translates it into a Morse code.

Just a Arduino board with a buzzer connected at the digital output 12 (one wire in the ground and the other in the 12).

Arduino

I tried to make the code as general as possible so you can easily adapt it for anthers ways of transmitting a Morse code. To do that you just need to rewrite a few functions.

                                                  +-------------------+
                                                  | 3) Interpretation |
                                                  +-------------------+
                                                  |   2) Translation  |
+-------------------+                             +-------------------+
|     Computer      |<========USB (Serial)=======>|     1) Reading    |
+-------------------+                             +-------------------+

  1. Reads a character from Serial. Main function loop().
  2. Translate a ascii char into a Morse code using a reference table. A letter ‘K’ becomes a string word “-.-“. Function say_char().
  3. Interpret the Morse word as light and sound. Mostly at function say_morse_word(). The Interpretation needs 5 functions to say all Morse words, dot(), dash(), shortgap(), mediumgap() and intragap().

For a more details on Morse code I strongly recommend the English Wikipedia article on it.

int led = 13;                   // LED connected to digital pin 13
int buzzer = 12;                // buzzer connected to digital pin 12
int unit = 50;                  // duration of a pulse

char * morsecode[] = {
    "-----",  // 0
    ".----",  // 1
    "..---",  // 2
    "...--",  // 3
    "....-",  // 4
    ".....",  // 5
    "-....",  // 6 
    "--...",  // 7
    "---..",  // 8
    "----.",  // 9
    "---...", // :
    "-.-.-.", // ;
    "",       // < (there's no morse for this simbol)
    "-...-",  // =
    "",       // > (there's no morse for this simbol)
    "..--..", // ?
    ".--._.", // @
    ".-",     // A
    "-...",   // B
    "-.-.",   // C
    "-..",    // D
    ".",      // E
    "..-.",   // F
    "--.",    // G
    "....",   // H
    "..",     // I
    ".---",   // J
    "-.-",    // K
    ".-..",   // L
    "--",     // M
    "-.",     // N
    "---",    // O
    ".--.",   // P
    "--.-",   // Q
    ".-.",    // R
    "...",    // S
    "-",      // T
    "..-",    // U
    "...-",   // V
    ".--",    // W
    "-..-",   // X
    "-.--",   // Y
    "--.."    // Z
};

void setup() {
  pinMode(led, OUTPUT);
  pinMode(buzzer, OUTPUT);
  Serial.begin(9600);
}

void say_morse_word(char * msg){
  int index = 0;
  while(msg[index]!='\0'){
    // say a dash
    if(msg[index]=='-'){
      dash();
    }
    // say a dot
    if(msg[index]=='.'){
      dot();
    }
    // gap beetween simbols
    intragap();
    index++;
  }
}

// beep
void beep(int time){
  int i;
  int t = 100; // period of the wav. bigger means lower pitch.
  int beepduration = (int)((float)time/t*1800);
  digitalWrite(led, HIGH);
  for(i=0;i='0')&&(letter<='Z')&&(letter!='<')&&(letter!='>')){
    Serial.print(morsecode[letter-'0']);
    Serial.print(' ');
    say_morse_word(morsecode[letter-'0']);
    shortgap();
  } else {
    if(letter==' '){
      Serial.print(" \\ ");
      mediumgap();
    }else{
      Serial.print("X");
    }
  }
}

void loop(){
  if(Serial.available()){
    say_char((char)Serial.read());
  }
}

Additionally you can put another function to say entire strings, like say_string(“HELLO WORLD”)

void say_string(char * asciimsg){
  int index = 0;
  char charac;  
  charac = asciimsg[index];
  while(charac!='\0'){
    say_char(morsecode[charac-'0']);
    Serial.println(morsecode[charac-'0']);
    charac = asciimsg[++index];
    shortgap();
  }
}

You can use the Arduino IDE itself or any other program that talks with the serial port USB.

arduino interface

Arduino on Ubuntu

Arduinos

My Arduinos arrived yesterday. It’s a programmable open source and hardware device.

To install its software on my Ubuntu 8.10 I need Java installed and some tools that I could get by:

sudo apt-get install avrdude avrdude-doc avrp avrprog binutils-avr gcc-avr

JavaFX, easy use of tiles

Continuing my little JavaFX framework for game development, right now focused on use those tiles I’m drawing and posting here in my blog. This framework will be a group of classes for simplify and hide some complexities of common game development. Right now I wrote just a few of them.

Use

We create a tileset from the files.png file that way

var tileset = Tileset {
    cols: 15 rows: 10 height: 32 width: 32
    image: Image {
        url: "{__DIR__}tiles.png"
    }
}

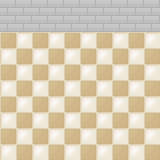
tiles

Tileset are orthogonal, distributed into a grid of cols columns and rows rows. Each tile have dimensions height x width.

A Tileset is used into a Tilemap

var bg = Tilemap {
    set:tileset cols:5 rows:5
    map: [8,8,8,8,8,3,3,3,3,3,3,3,3,3,3,3,3,3,3,3,3,3,3,3,3]
}

That shows

bg tilemap

Each number in the map represents a tile in the tilemap. Number 0 means the first tile at the upper left corner, numbers keep growing from left to right columns, from top to bottom rows.

Another example

var things = Tilemap {
    set:tileset cols:5 rows:5
    map: [80,55,56,145,145,96,71,72,61,62,0,0,0,77,78,122,0,0,93,94,138,0,0,0,0]
}

things tileset

A tilemap can also contains more than one layer

var room = Tilemap {
    set:tileset cols:5 rows:5 layers:2
    map: [
        [8,8,8,8,8,3,3,3,3,3,3,3,3,3,3,3,3,3,3,3,3,3,3,3,3],
        [80,55,56,145,145,96,71,72,61,62,0,0,0,77,78,122,0,0,93,94,138,0,0,0,0]
    ]
}

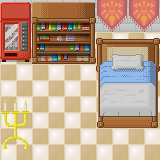
tileroom

Implementation

The Tileset class basically stores a Image and a collection of Rectangle2D objects, for be used as viewports in ImageView classes.

import javafx.scene.image.ImageView;
import javafx.scene.image.Image;
import javafx.geometry.Rectangle2D;

public class Tileset {
    public-init var      image: Image;
    public-init var      width: Integer = 32;
    public-init var     height: Integer = 32;
    public-init var       rows: Integer = 10;
    public-init var       cols: Integer = 15;
    protected   var       tile: Rectangle2D[];

    init {
        tile =  for (row in [0..rows]) {
            for (col in [0..cols]) {
                Rectangle2D{
                    minX: col * width, minY: row * height
                    height: width, width: height
                }
            }
        }
    }
}

The Tilemap is a CustomNode with a Group of ImageViews in a grid. The grid is mounted by iterating over the map as many layers was defined.

public class Tilemap extends CustomNode {
    public-init var   rows: Integer = 10;
    public-init var   cols: Integer = 10;
    public-init var    set: Tileset;
    public-init var layers: Integer = 1;
    public-init var    map: Integer[];

    public override function create(): Node {
        var tilesperlayer = rows * cols;
        return Group {
            content:
                for (layer in [0..layers]) {
                    for (row in [0..rows-1]) {
                        for (col in [0..cols-1]) {
                            ImageView {
                                image: set.image x: col * set.width y: row * set.height
                                viewport: set.tile[map[tilesperlayer*layer + row*rows+col]]
                            }
                        }
                    }
                }
        };
    }
}

Next steps

  • Integrate to a map editor
  • Support some XML map format
  • Sprite classes for animation
  • Integrate those collision detection classes I posted before

Download

C Gaussian Elimination Implementation

A simple gaussian elimination implemented in C.

To simplify, I hard coded the linear system

10 x1 + 2 x2 + 3 x3 + 4 x4 = 5
6 x1 + 17 x2 + 8 x3 + 9 x4 = 10
11 x1 + 12 x2 + 23 x3 + 14 x4 = 15
16 x1 + 17 x2 + 18 x3 + 29 x4 = 20

into the AB float matrix.

/* 
 * Description: Solve a hard coded linear system by gaussian elimination
 * Author: Silveira Neto
 * License: Public Domain
 */

#include 
#include 

#define ROWS 4
#define COLS 5

/**
 * Linear System, Ax = B
 *
 * 10*x1 +  2*x2 +  3*x3 +  4*x4 = 5
 *  6*x1 + 17*x2 +  8*x3 +  9*x4 = 10
 * 11*x1 + 12*x2 + 23*x3 + 14*x4 = 15
 * 16*x1 + 17*x2 + 18*x3 + 29*x4 = 20
 */
float AB[ROWS][COLS] = {
    {10,  2,  3,  4,  5},
    { 6, 17,  8,  9, 10},
    {11, 12, 23, 14, 15},
    {16, 17, 18, 29, 20}
};

/* Answer x from Ax=B */
float X[ROWS] = {0,0,0,0};

int main(int argc, char** argv) {
    int row, col, i;

    /* gaussian elimination */
    for (col=0; col

Before the gaugassian elimination, AB is

10  2  3  4  5
 6 17  8  9 10
11 12 23 14 15
16 17 18 29 20

and after it is

10.00000 0.00000 0.00000 0.00000 2.82486 
0.00000 15.80000 0.00000 0.00000 3.92768 
0.00000 0.00000 15.85443 0.00000 3.85164 
0.00000 0.00000 0.00000 14.13174 3.35329 

that corresponds to

10 x1 = 2.82486
15.80000 x2 = 3.92768
15.85443 x3 = 3.85164
14.13174 x4 = 3.35329

The solution vector is X = (x1, x2, x3, x4). We get it by X=B/A.

The program output, X, is

0.28249 0.24859 0.24294 0.23729

Benchmarking:
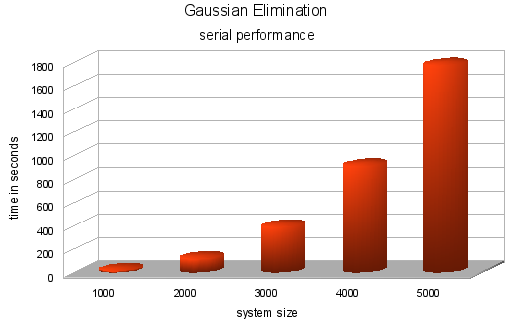
I'm this serial implementation over one node of our cluster, a machine with 4 processors (Intel Xeon 1.8 Ghz) and 1Gb RAM memory. I tried random systems from 1000 to 5000 variables and got the average time.

gaugassian elimination serial

JavaFX, rectangular collision detection

[youtube]NRwRTHPGg6M[/youtube]

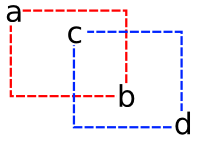
In a game I wrote some years ago we handled simple rectangular collisions. Given the points:

We did:

// returning 0 means collision
int collision(int ax, int ay, int bx, int by, int cx, int cy, int dx, int dy){
	return ((ax > dx)||(bx < cx)||(ay > dy)||(by < cy));
}

I'll show here a little demo about how implement simple rectangular collisions on JavaFX.
First I created a movable rectangle using the same idea of draggable nodes I already had posted before.

import javafx.input.MouseEvent;
import javafx.scene.geometry.Rectangle;

public class MovableRectangle extends Rectangle {
    private attribute startX = 0.0;
    private attribute startY = 0.0;

    public attribute onMove = function(e:MouseEvent):Void {}

    override attribute onMousePressed = function(e:MouseEvent):Void {
        startX = e.getDragX()-translateX;
        startY = e.getDragY()-translateY;
        onMove(e);
    }

    override attribute onMouseDragged = function(e:MouseEvent):Void {
        translateX = e.getDragX()-startX;
        translateY = e.getDragY()-startY;
        onMove(e);
    }
}

In the main code I some important things:

  • colide, a color that represents the collision effect. White means no collision and gray means collision.
  • rec1 and rec2, the two rectangles that can collide.
  • checkcollision() the function that checks and handles a possible collision.

Here is the main code:

import javafx.application.Frame;
import javafx.application.Stage;
import javafx.scene.geometry.Rectangle;
import javafx.scene.paint.Color;
import javafx.input.MouseEvent;

var colide = Color.WHITE;

function checkcollision():Void {
    if (
        (rec1.getBoundsX() > rec2.getBoundsX() + rec2.getWidth()) or
        (rec1.getBoundsX() + rec1.getWidth() < rec2.getBoundsX()) or 
        (rec1.getBoundsY() > rec2.getBoundsY() + rec2.getHeight()) or 
        (rec1.getBoundsY() + rec1.getHeight() < rec2.getBoundsY())
    ) {
        colide = Color.WHITE
    } else {
        colide = Color.LIGHTGRAY
    }
}

var rec1: MovableRectangle = MovableRectangle {
    x: 10, y: 10, width: 50, height: 60, fill: Color.RED
    onMove: function(e:MouseEvent):Void {
        checkcollision()
    }
}

var rec2: MovableRectangle = MovableRectangle {
    x: 100, y: 100, width: 70, height: 30, fill: Color.BLUE
    onMove: function(MouseEvent):Void {
        checkcollision()
    }
}
Frame {
    title: "Rectangular Collisions", width: 300, height: 300
    closeAction: function() { 
        java.lang.System.exit( 0 ); 
    }
    visible: true

    stage: Stage {
        fill: bind colide
        content: [rec1, rec2]
    }
}

Try it via Java Web Start:

Java Web Start

Some considerations:

  • You can use rectangular collisions to create bounding boxes to handle collisions in more complex shapes or sprites. Is a common approach in 2d games to avoid more expensive calculations.
  • There are space for optimizations.
  • In this case I'm using only two objects. Some problems raises when I have N objects to handle.

More generally, we can code:

function collission(ax, ay, bx, by, cx, cy, dx, dy): Boolean {
    return not ((ax > dx)or(bx < cx)or(ay > dy)or(by < cy));
}

function hitnode(a: Node, b:Node): Boolean{
    return (collission(
        a.getBoundsX(), a.getBoundsY(),
        a.getBoundsX() + a.getWidth(), a.getBoundsY() + a.getHeight(),
        b.getX(), b.getY(),
        b.getX() + b.getWidth(), b.getY() + b.getHeight()
    ));
}

This way we can pass just two bounding boxes to hitnode and easily check collision of a node against a list of bounding boxes nodes.
Using the same approach I also wrote this function to test if a Node is inside another Node:

function inside (ax, ay, bx, by, cx, cy, dx, dy):Boolean{
    return ((ax > cx) and (bx < dx) and (ay > cy) and (by < dy));
}

function insidenode(a:Node,b:Node):Boolean{
    return (inside(
        a.getBoundsX(), a.getBoundsY(),
        a.getBoundsX() + a.getWidth(), a.getBoundsY() + a.getHeight(),
        b.getBoundsX(), b.getBoundsY(),
        b.getBoundsX() + b.getWidth(), b.getBoundsY() + b.getHeight()
    ));
}

Soon I'll post game examples showing how to use this method and others collission detection methods.

Downloads:

Criando Imagens Dinâmicas em Java na Web

Durante a apresentação do Tarso Bessa em Sobral alguém na platéia perguntou sobre um equivalente a biblioteca GD no PHP. O GD é uma biblioteca para manipulação de imagens comumente usado para criação de imagens dinâmicas (como gráficos) ou miniaturização de imagens. A libGD está disponível para várias linguagens além do PHP.

A respostá para a pergunta é bem simples, você pode usar todo o suporte para imagens disponível no Java SE (inclusive toda a API de Java2D).

Alguns links que podem ajudar:

Looking for databases drivers

A simple Java servlet that looks for some well known databases drivers.

import java.io.IOException;
import java.io.PrintWriter;
import javax.servlet.ServletException;
import javax.servlet.http.HttpServlet;
import javax.servlet.http.HttpServletRequest;
import javax.servlet.http.HttpServletResponse;

public class TestDB extends HttpServlet {
    public void tryDataBase(String name, String url, PrintWriter out){
        String fail = "fail";
        String sucess = "Ok";
        out.println("Looking for the "+ name +" driver...");
        try {
            Class.forName(url);
            out.println(sucess);
        } catch (ClassNotFoundException ex) {
            out.println(fail);
        }
        out.println("
");
    }

    @Override
    protected void doGet(HttpServletRequest request, HttpServletResponse response)
    throws ServletException, IOException {
        response.setContentType("text/html;charset=UTF-8");
        PrintWriter out = response.getWriter();
        try {
            out.println("Looking for databases");
            out.println("

Looking for databases

"); tryDataBase("MySQL", "com.mysql.jdbc.Driver", out); tryDataBase("Derby", "org.apache.derby.jdbc.EmbeddedDriver", out); tryDataBase("PostgreSQL", "org.postgresql.Driver", out); tryDataBase("Oracle", "oracle. jdbc.driver.OracleDriver", out); tryDataBase("SQLite", "org.sqlite.JDBC", out); out.println(""); } finally { out.close(); } } }

When compiling and running this make sure you put your drivers in your classpath.

A example of output:

example

Example of Unix commands implemented in Java

I created some illustrative and simple implementations of common Unix commands. For those who are familiar with Unix-like systems them make easier to understand Java. For those who are familiar with Java them make easier to understand Unix-like systems. 🙂

1. PWD

The first one is pwd that show the current working directory.

public class Jpwd {
    public static void main(String[] args) {
        String pwd = System.getProperty("user.dir");
        System.out.println(pwd);
    }
}

Running this at /home/silveira directory gives us as output:

$ java Jpwd

/home/silveira

1. CAT

The command cat is usually utilized for displaying files.

import java.io.BufferedReader;
import java.io.FileNotFoundException;
import java.io.FileReader;
import java.io.IOException;

public class Jcat {
    public static void main(String[] args) {
        if(args.length==1){
            try {
                FileReader fileReader = new FileReader(args[0]);
                BufferedReader in = new BufferedReader(fileReader);
                String line;
                while((line = in.readLine())!= null){
                    System.out.println(line);
                }
            } catch (FileNotFoundException ex) {
                System.out.println(args[0]+", file not found.");
            }
            catch (IOException ex) {
                System.out.println(args[0]+", input/output error.");
            }
        }
    }
}

$ java Jcat /etc/timezone

America/Fortaleza

3. LS

The command ls is to list files. The File API (java.io.File) is very flexible and portable, but in this example I want just list files and directories of the current directory.

import java.io.File;

public class Jls {
    public static void main(String[] args) {
        File dir = new File(System.getProperty("user.dir"));
        String childs[] = dir.list();
        for(String child: childs){
            System.out.println(child);
        }
    }
}

Usage:

$ java Jpwd

/home/silveira/example

$ java Jls

directoryA

fileA

.somefile

4. CD

The cd command changes the current working directory.

import java.io.File;

public class Jcd {
    public static void main(String[] args) {
        if(args.length==1){
            File dir = new File(args[0]);
            if(dir.isDirectory()==true) {
                System.setProperty("user.dir", dir.getAbsolutePath());
            } else {
                System.out.println(args[0] + "is not a directory.");
            }
        }
    }
}

Usage:

$ java Jpwd
/home/silveira
$ java Jcd /tmp
$ java Jpwd
/tmp