Skip to content

Tag: Java

Java Font List

Here’s a program that lists fonts available in your JVM. You can also set the environment variable JAVA_FONTS to specify the font directory.

import java.awt.GraphicsEnvironment;

public class ListFonts {
	public static void main(String args[]){
		GraphicsEnvironment e = GraphicsEnvironment.getLocalGraphicsEnvironment();
		for(String font:e.getAvailableFontFamilyNames()){
			System.out.println(font);
		}
	}
}

By using pipes you can count how many fonts you have:

java ListFonts|wc -l

On my Ubuntu machine here I got 556 because I use those excellent, free and indispensable Larabie Fonts.

For looking up for a font with “sans” in its name, using a case insensitive grep:

java ListFonts|grep -i “sans”

I get a list like this:

DejaVu Sans
DejaVu Sans Condensed
DejaVu Sans Light
DejaVu Sans Mono
FreeSans

Tiled TMX Map Loader for Pygame

I’m using the Tiled Map Editor for a while, I even wrote that tutorial about it. It’s a general purpose tile map editor, written in Java but now migrating to C++ with Qt, that can be easily used with my set of free pixelart tiles.

map editor tiles tileset game deveopment

A map done with Tiled is stored in a file with TMX extension. It’s just a XML file, easy to understand.

As I’m creating a map loader for my owns purposes, the procedure I’m doing here works we need some simplifications. I’m handling orthogonal maps only. I’m not supporting tile properties as well. I also don’t want to handle base64 and zlib encoding in this version, so in the Tiled editor, go at the menu Edit → Preferences and in the Saving tab unmark the options “Use binary encoding” and “Compress Layer Data (gzip)”, like this:
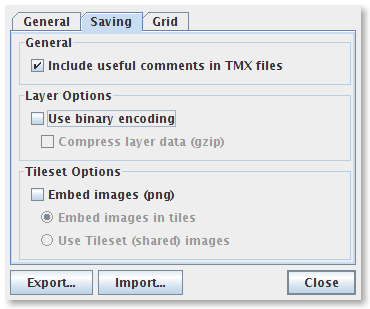
Tiled Preferences Window

When saving a map it will produce a TMX file like this:


    ...


For processing it on Python I’m using the event oriented SAX approach for XML. So I create a ContentHandler that handles events the start and end of XML elements. In the first element, map, I know enough to create a Pygame surface with the correct size. I’m also storing the map properties so I can use it later for add some logics or effects on the map. After that we create a instance of the Tileset class from where we will get the each tile by an gid number. Each layer has it’s a bunch of gids in the correct order. So it’s enough information to mount and draw a map.

# Author: Silveira Neto
# License: GPLv3
import sys, pygame
from pygame.locals import *
from pygame import Rect
from xml import sax

class Tileset:
    def __init__(self, file, tile_width, tile_height):
        image = pygame.image.load(file).convert_alpha()
        if not image:
            print "Error creating new Tileset: file %s not found" % file
        self.tile_width = tile_width
        self.tile_height = tile_height
        self.tiles = []
        for line in xrange(image.get_height()/self.tile_height):
            for column in xrange(image.get_width()/self.tile_width):
                pos = Rect(
                        column*self.tile_width,
                        line*self.tile_height,
                        self.tile_width,
                        self.tile_height )
                self.tiles.append(image.subsurface(pos))

    def get_tile(self, gid):
        return self.tiles[gid]

class TMXHandler(sax.ContentHandler):
    def __init__(self):
        self.width = 0
        self.height = 0
        self.tile_width = 0
        self.tile_height = 0
        self.columns = 0
        self.lines  = 0
        self.properties = {}
        self.image = None
        self.tileset = None

    def startElement(self, name, attrs):
        # get most general map informations and create a surface
        if name == 'map':
            self.columns = int(attrs.get('width', None))
            self.lines  = int(attrs.get('height', None))
            self.tile_width = int(attrs.get('tilewidth', None))
            self.tile_height = int(attrs.get('tileheight', None))
            self.width = self.columns * self.tile_width
            self.height = self.lines * self.tile_height
            self.image = pygame.Surface([self.width, self.height]).convert()
        # create a tileset
        elif name=="image":
            source = attrs.get('source', None)
            self.tileset = Tileset(source, self.tile_width, self.tile_height)
        # store additional properties.
        elif name == 'property':
            self.properties[attrs.get('name', None)] = attrs.get('value', None)
        # starting counting
        elif name == 'layer':
            self.line = 0
            self.column = 0
        # get information of each tile and put on the surface using the tileset
        elif name == 'tile':
            gid = int(attrs.get('gid', None)) - 1
            if gid <0: gid = 0
            tile = self.tileset.get_tile(gid)
            pos = (self.column*self.tile_width, self.line*self.tile_height)
            self.image.blit(tile, pos)

            self.column += 1
            if(self.column>=self.columns):
                self.column = 0
                self.line += 1

    # just for debugging
    def endDocument(self):
        print self.width, self.height, self.tile_width, self.tile_height
        print self.properties
        print self.image

def main():
    if(len(sys.argv)!=2):
        print 'Usage:\n\t{0} filename'.format(sys.argv[0])
        sys.exit(2)
    pygame.init()
    screen = pygame.display.set_mode((800, 480))
    parser = sax.make_parser()
    tmxhandler = TMXHandler()
    parser.setContentHandler(tmxhandler)
    parser.parse(sys.argv[1])
    while 1:
        for event in pygame.event.get():
            if event.type == QUIT:
                return
            elif event.type == KEYDOWN and event.key == K_ESCAPE:
                return
        screen.fill((255,255,255))
        screen.blit(tmxhandler.image, (0,0))
        pygame.display.flip()
        pygame.time.delay(1000/60)

if __name__ == "__main__": main()

Here is the result for opening a four layers map file:
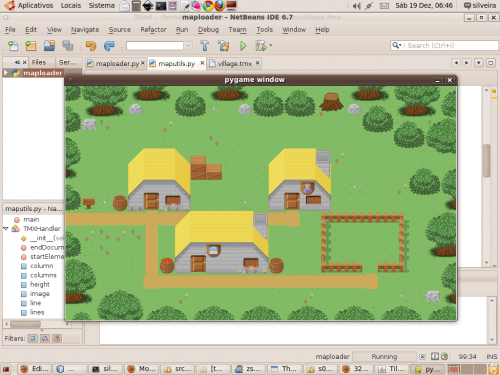
netbeans python openning map

That’s it. You can get this code and adapt for your game because next versions will be a lot more coupled for my own purposes and not so general.

Download:packagemaploader.tar.bz2 It’s the Netbeans 6.7 (Python EA 2) project file but that can be opened or used with another IDE or without one. Also contains the village.tmx map and the tileset.

Java: Accessing Private Members

Using reflection to change the accessibility of a private object field and access it at runtime.

import java.lang.reflect.Field;

class Life {
    private int meaning = 42;
}

class Hack {
    public static void main(String args[]){
        Life life = new Life();
        try {
            Field field = life.getClass().getDeclaredField("meaning");
            field.setAccessible(true);
            System.out.println(field.get(life));
        } catch (NoSuchFieldException e) {
            e.printStackTrace();
        } catch (IllegalAccessException e){
            e.printStackTrace();
        }
    }
}

Output:

42

Jedi Name

lightsaber

A simple Java class that calculates your Jedi name based on your first, last name, mother’s maiden name and the city you grew up.

/*
 Jedi first name: 1st 3 letters of last name + 1st 2 letters of first name
 Jedi last name: 1st 2 letters of mother's maiden name + 1st 3 letters of city you were raised in
 */

public class JediName {
   private static String capitalize(String s){
      return s.substring(0,1).toUpperCase() + s.substring(1,s.length()).toLowerCase();
   }

   private static String sub(String s, int begin, int end){
      return s.substring(begin, (s.length()>=end)?end:s.length());
   }

   public static String generate(String firstName, String lastName, String city, String mother ){
      String jediFirstName = capitalize(sub(lastName, 0, 3) + sub(firstName, 0,2));
      String jediLastName = capitalize(sub(mother,0,2)+ sub(city,0,3));
      return jediFirstName + " " + jediLastName;
   }
}

I used inline conditional expression ()?: to avoid raise a IndexOutOfBoundsException when the string is to small to cut the proper size we want.

And a example of how to use it:

public class JediNameTester {
	public static void main(String args[]){
		String myJediName = JediName.generate("Pedro", "Madeira", "Fortaleza", "Maria");
		System.out.println(myJediName);
	}
}

My jedi name is Siljo Iruba. 🙂

7 anos de CEJUG

niver cct 2009

fontes: cct-set-2009.zip

O CEJUG está comemorando seu sétimo aniversário com um Café com Tapioca especial e imperdível com diversos palestrantes nacionais e muitos sorteios de brindes. A programação completa e as incrições podem ser feitas atráves do site cafecomtapioca.com! Não percam por nada.

JavaFX 1.1 for Linux workaround

Download

javafx4linux.tar.bz2 (~ 36Mb).

Installing

1) Extract the javafx4linux.tar.bz2 file. In this example I’m placing it on my Desktop. After the installing process you can remove it.

javafx linux ubuntu extract

2) Open your NetBeans 6.5 and go at Tools → Plugins and go to Downloaded tab. In a plain and new NetBeans installation there will be no plugin in this tab yet.

netbeans javafx linux step01

netbeans javafx linux step02

netbeans javafx linux step03

3) Click on the Add Plugins button and head to the directory you extracted the file and select all .nbm files.

netbeans javafx linux step 04

4) You will see a list of 22 plugins selected. Click on the Install button.

netbeans javafx linux step 05

5) Just keep clicking on the Next button.

netbeans javafx linux step 6

6) Check the license agreement accept box.

netbeans javafx linux step 7

7) You’ll see a warning because the Linux pluggin is not signed. Don’t worry, just click Continue.

netbeans javafx linux step 8

8) Click on Finish to restart NetBeans.

netbeans javafx linux step 9

9) Now we can test it. Go at File → New Project, select the JavaFX on Categories and JavaFX Script Application on Projects.

netbeans javafx linux step 10

10) Put some code and run it. There is. JavaFX on Linux.

netbeans javafx linux step 11

Considerations

This is not a official of JavaFX for Linux! This solution was tested on Ubuntu 9.04 “Jaunty Jackalope” with Java 6 update 13 and NetBeans 6.5.1, but should also work with others Linux distributions and Java versions greater than 5.

Known bugs

As a non official workaround for JavaFX for Linux you may notice some drawbacks. Some parts of the JavaFX runtime rely on native implementations on the specific operational system. You may not use some multimedia capabilities as video playback, JavaFX Mobile emulator and some performance issues in some effects. Despite that, is perfectly possible to develop applications using JavaFX on NetBeans.

Thanks

I’d like to thanks some guys around the world. Weiqi Gao’s original post on JavaFX on Linux, HuaSong Liu article on DZone and Kaesar Alnijres post.

CEJUG Podcast #2

cejug podcast java
[audio:http://cejug.podomatic.com/enclosure/2009-03-17T08_20_43-07_00.mp3]

O Igo Coelho recebe neste episódio eu e  o Amaury Brasil,  falamos sobre o que é o CCT, PUJ e os temas do próximo encontro dia 23 de março de 2009 na UNIFOR. Apresentando o LWUIT com Daniel Valente e Introdução a programação em Java para a TV Digital com Amaury Brasil.

podcast

Fotos da gravação lá na Fortes.

Parabéns ao Igo Coelho mais uma vez pela iniciativa e a todos que contribuíram para fazer mais esse episódio do CEJUG Podcast acontecer. ;D

BumbaBot-1

I got a simple motor from a broken domestic printer. It’s a Mitsumi m355P-9T stepping motor. Any other common stepping motor should fits. You can find one in printers, multifunction machines, copy machines, FAX, and such.

bumbabot v01

With a flexible cap of water bottle with a hole we make a connection between the motor axis and other objects.

bumbabot v01

bumbabot v01

With super glue I attached to the cap a little handcraft clay ox statue.

bumbabot v01

It’s a representation from a Brazilian folkloric character Boi Bumbá. In some traditional parties in Brazil, someone dress a structure-costume and dances in circular patterns interacting with the public.

776513346_c31db6843b_m

2246467684_49164d3397_m
Photos by Marcus Guimarães.

Controlling a stepper motor is not difficult.  There’s a good documentation on how to that on the Arduino Stepper Motor Tutorial. Basically it’s about sending a logical signal for each coil in a circular order (that is also called full step).

full step

Animation from rogercom.com.

stepper motor diagram

You’ll probably also use a driver chip ULN2003A or similar to give to the motor more current than your Arduino can provide and also for protecting it from a power comming back from the motor. It’s a very easy find this tiny chip on electronics or automotive  stores or also from broken printers where you probably found your stepped motor.

Arduino Stepper Motor UNL2003A

With a simple program you can already controlling your motor.

// Simple stepped motor spin
// by Silveira Neto, 2009, under GPLv3 license
// http://silveiraneto.net/2009/03/16/bumbabot-1/
int coil1 = 8;
int coil2 = 9;
int coil3 = 10;
int coil4 = 11;
int step = 0;
int interval = 100;

void setup() {
  pinMode(coil1, OUTPUT);
  pinMode(coil2, OUTPUT);
  pinMode(coil3, OUTPUT);
  pinMode(coil4, OUTPUT);
}

void loop() {
  digitalWrite(coil1, step==0?HIGH:LOW);
  digitalWrite(coil2, step==1?HIGH:LOW);
  digitalWrite(coil3, step==2?HIGH:LOW);
  digitalWrite(coil4, step==3?HIGH:LOW);
  delay(interval);
  step = (step+1)%4;
}


Writing a little bit more generally code we can create function to step forward and step backward.

My motor needs 48 steps to run a complete turn. So 360º/48 steps give us 7,5º per step. Arduino has a simple Stepper Motor Library but it doesn’t worked with me and it’s also oriented to steps and I’d need something oriented to angles instead. So I wrote some routines to do that.

For this first version of BumbaBot I mapped angles with letters to easy the communication between the programs.

motor angle step control

Notice that it’s not the final version and there’s still some bugs!

// Stepped motor control by letters
// by Silveira Neto, 2009, under GPLv3 license
// http://silveiraneto.net/2009/03/16/bumbabot-1/

int coil1 = 8;
int coil2 = 9;
int coil3 = 10;
int coil4 = 11;

int delayTime = 50;
int steps = 48;
int step_counter = 0;

void setup(){
  pinMode(coil1, OUTPUT);
  pinMode(coil2, OUTPUT);
  pinMode(coil3, OUTPUT);
  pinMode(coil4, OUTPUT);
  Serial.begin(9600);
}

// tells motor to move a certain angle
void moveAngle(float angle){
  int i;
  int howmanysteps = angle/stepAngle();
  if(howmanysteps<0){
    howmanysteps = - howmanysteps;
  }
  if(angle>0){
    for(i = 0;i

In another post I wrote how create a Java program to talk with Arduino. We'll use this to send messages to Arduino to it moves. 

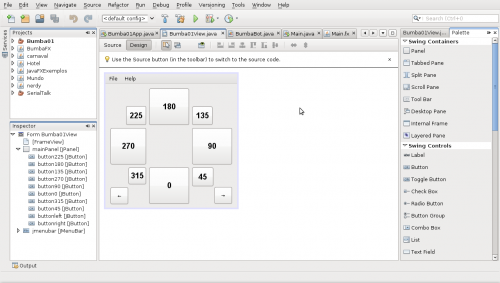
captura_de_tela-bumba01-netbeans-ide-65

[put final video here]

To be continued... 🙂